


Arduino remote control PAD app using a wireless module available in Arduino.
Bluetooth 2.0 Classic / 4.0 BLE : HC-05, HC-06, HM-10, AT-09, BT05, ESP32, etc.
Wi-Fi : ESP01, ESP8266 NodeMcu, ESP32, etc.
https://play.google.com/store/apps/details?id=io.kodular.skyship72.pad01
ADUPAD - Google Play 앱
무선(WiFi/Bluetooth/BLE)을 통한 Arduino 원격 제어 PAD
play.google.com
Characteristic
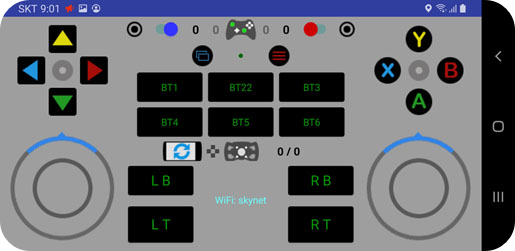
- 2 pcs joysticks.
- 1 pc gravity sensor controller.
- 20 pcs buttons for control: Toggle and push button property setting function.
Some button labels can be customized.
- Provides a dialog window to set the control authority using a password
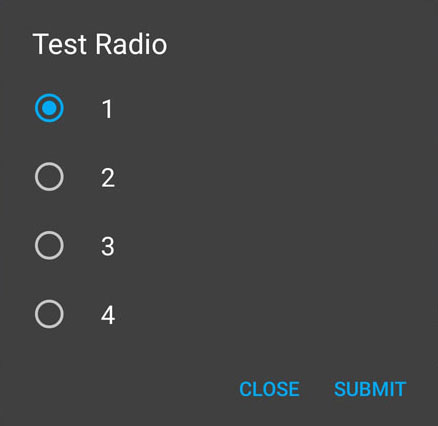
- Provides custom dialog windows (radio box, check box, text input, etc.)
- The screen stays on while the app is running (prevents the screen from turning off)
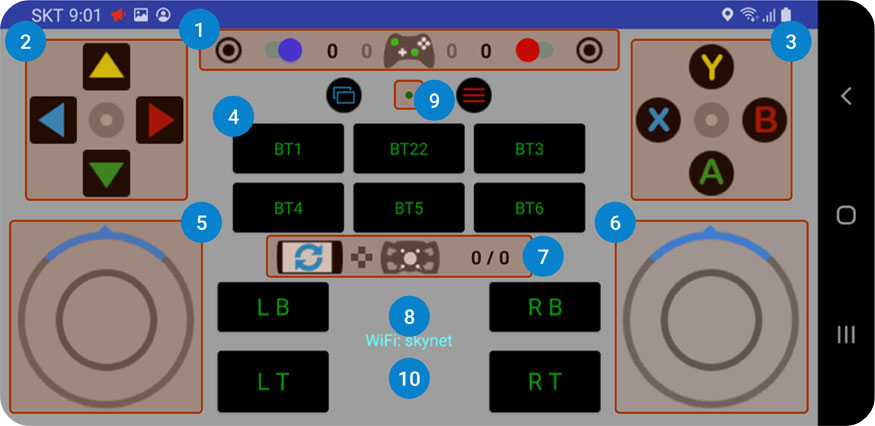
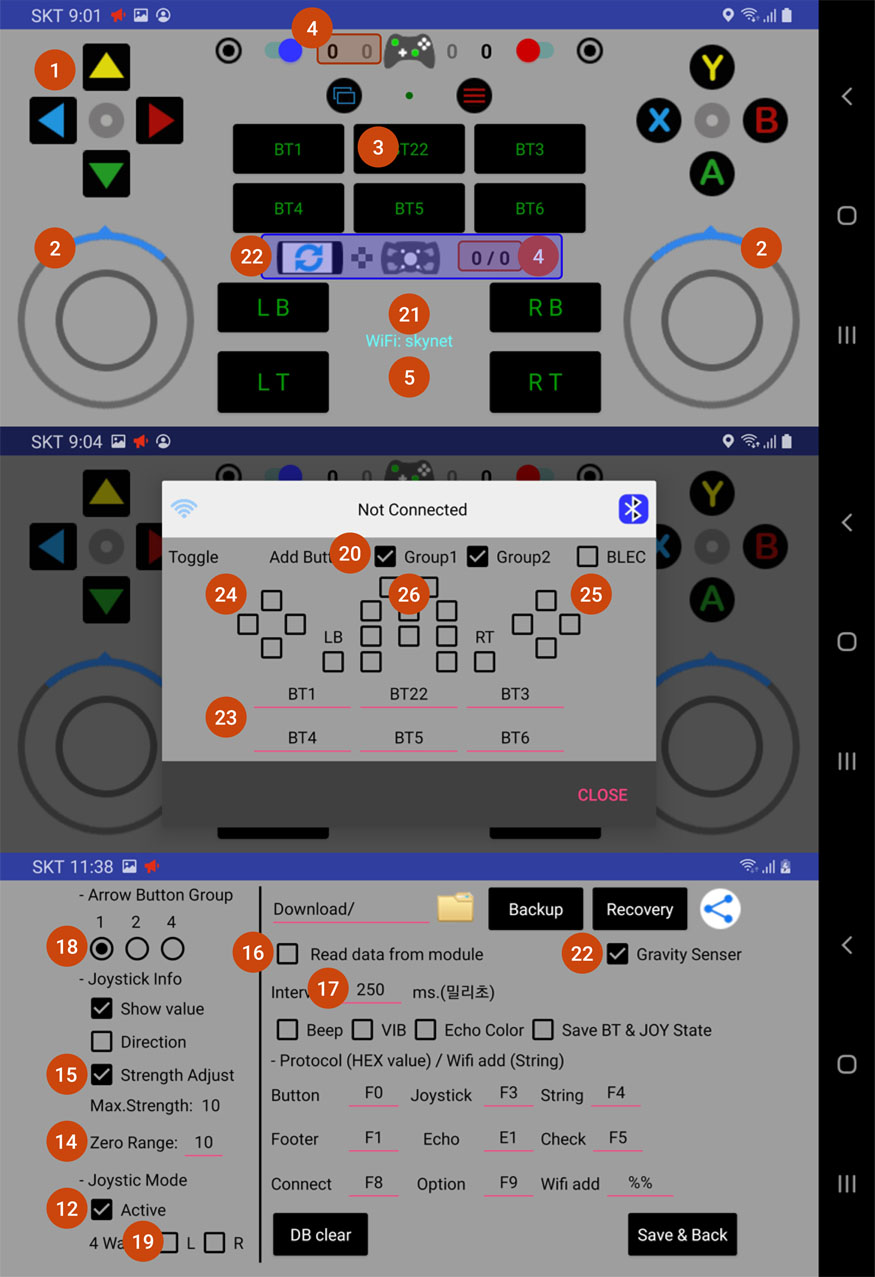
1. Top Menu


Click: Open Arduino connection and pop-up window for button setting.
Long click: move to setting screen of the option.
Joystick Information: Joystick Heading / Strength :: Strength / Joystick Heading
Can set whether to display "Joystick_Information" on the option setting screen.

Swap left joystick and arrow buttons position up and down.

Swap right joystick and buttons position up and down.

Passive Joystick Mode: Initialize joystick position when clicked (centering).
Active Joystick Mode: Set whether or not to reset the position (centering) when the joystick is touched up.
Display content by icon color
 |
Disconnected / Passive Joystick Mode |  |
Disconnected / Active Joystick Mode |
 |
Connected / Passive Joystick Mode |  |
Connected / Active Joystick Mode |
2. Left arrow button: works as a push or toggle propertys.
Group options for toggle properties: Only one of the buttons in a group will be in the ON state.
1: Single operation per button - All buttons can be turned ON.
2: Work with two groups of up/down and left/right.
4: 4 buttons work as a group.
- button value
UP: Toggle on(11)/off(10), Push down(11)/up(10)
LEFT: Toggle on(21)/off(20), Push down(21)/up(20)
RIGHT: Toggle on(31)/off(30), Push down(31)/up(30)
DOWN: Toggle on(41)/off(40), Push down(41)/up(40)
CENTER: 210
3. Right button: works with push or toggle properties
- button value
Y: Toggle on(51)/off(50), Push down(51)/up(50)
X: Toggle on(61)/off(60), Push down(61)/up(60)
B: Toggle on(71)/off(70), Push down(71)/up(70)
A: Toggle on(81)/off(80), Push down(81)/up(80)
CENTER: 220
4. 12 pcs buttons of middle: works as a push or toggle properties.

Group button: can set the button display and label in the popped up connection window.
- button value
M: Toggle on(91)/off(90), Push down(91)/up(90)
L: Toggle on(101)/off(100), Push down(101)/up(100)
Button 1: Toggle on(111)/off(110), Push down(111)/up(110)
Button 2: Toggle on(121)/off(120), Push down(121)/up(120)
Button 3: Toggle on(131)/off(130), Push down(131)/up(130)
Button 4: Toggle on(141)/off(140), Push down(141)/up(140)
Button 5: Toggle on(151)/off(150), Push down(151)/up(150)
Button 6: Toggle on(161)/off(160), Push down(161)/up(160)
LB: Toggle on(171)/off(170), Push down(171)/up(170)
LT: Toggle on(181)/off(180), Push down(181)/up(180)
RB: Toggle on(191)/off(190), Push down(191)/up(190)
RT: Toggle on(201)/off(200), Push down(201)/up(200)
*** All buttons in the push property are short touched and send only the pushed value.
5. Left Joystick: ID(0), Heading(0 ~ 359) / Strength value transmission.
6. Right Joystick: ID(1), Heading(0 ~ 359) / Strength value transmission.
*** In the case of the Active Joystick Option, the value is continuously transmitted at the specified time interval, and in the case of the Passive Joystick Option, the value is transmitted only during touch-up.
7. Gravity sensor controller:
Transmits forward/backward/left/right tilt of the mobile phone as ID(2), Heading(0 ~ 359) / Strength value per set interval (Default: 180ms).

Gravity sensor icon indication by color
 |
Sensor Off |  |
Sensor On |  |
Sensor On & Active |
Gravity sensor Active area: After the gravity sensor is turned on, it operates when it is between 0 degrees and about 30 degrees, and transmits the value based on the position when it is first operated.

SCREEN ROTATION: Rotates the phone's screen 180 degrees.
DIRECTION: 8 directions display(8-point).
Can set whether to display the gravity sensor controller on the option setting screen.
8. Wireless connection information, long click - Display connection information. (only works when connected and display option is enabled)
9. blinker indication of a timer for sending "0xF5 or %%F5", click - timer ON/OFF. (works only in connected state)
10. Displays the text received from Arduino.
Pop-up window for Connection / Button Settings

1. Shows if Wi-Fi is on or off and connect to Arduino via Wi-Fi.
2. Bluetooth connection button.
3. Whether or not the group button is displayed
4. BLEC: If you want to connect using a specific Custom UUID when connecting to BLE(Bluetooth 4.0).
* In the general case, you can connect without specifying a custom UUID.
5. Toggle (Check) and push (Uncheck) setting of all buttons.
6. Label settings for group buttons
Option setting screen

Set Toggle Property of a group for Left Arrow Button
1: Assign each button as a group.
2: Specify in two groups: top/bottom and left/right.
4: 4 buttons assigned as a group.

Joystick Settings Information
Show value: Display joystick heading and strength or joystick 8 directions.
Direction check: display 8 direction according to heading of joystick.
Direction uncheck: display values of joystick heading and strength.
Strength Adjust uncheck: The joystick has a value in the range of 0 to 45/50 according to the resolution of the mobile phone, and the value obtained by subtracting the Zero Range from that value is transmitted as the strength value.
Strength Adjust check: Regardless of the resolution of the mobile phone, it is converted into a value between 0 and 10 and transmitted it as a strength value.
Max.Strength: The value when Strength Adjust is checked is 10, and when it is not checked, it is the value obtained by subtracting Zero Range from 45/50.
Zero Range: Set the range where the strength of the joystick becomes 0. (enter a value from 0 to 35)
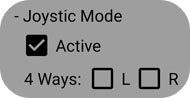
Active: Active / Passive Joystick Settings
Active check: Transmits the value of the joystick at specified intervals. (Default: 40 milliseconds)
Active uncheck(Passive Joystick): it only transmit the value when the joystick is released.

Open folder Icon: Display file list in designated path (Download/) and read selected data (txt) file.
Backup: Back up app settings and save them to path (Download)/Config.pwm.txt file.
In Android's API 29 or lower, it is saved as Config.pwm.txt in the internal storage and the designated path.

Recovery: Restore backed up settings.

Share icon: Attach Config.pwm.txt file to SNS (Email, etc.).


Read data from arduino: Set whether or not using of the timer to send Check(0xF5) for reflecting values independently changed on Arduino without specific operations (buttons and SeekBar) of the app.
Reading Interval: Interval of timer to send Check(0xF5).

Beep: Outputs a beep when a button or Joystick is touched.
VIB: Vibrate on touch of buttons and Joystick.
Echo Color: In the case of a button with a label, set whether or not the text color is changed when echo data is received.
Save BT & JOY State: Saving transmission values of button and joystick.

Protocol header settings
Button: "F0" - Bluetooth: 0xF0, WiFi: "%%F0"
Joystick: "F3" - Bluetooth: 0xF3, WiFi: "%%F3"
String: "F4" - Bluetooth: 0xF4, WiFi: "%%F4"
Footer: "F1" - Bluetooth: 0xF1, WiFi: "%%F1"
Echo: "E1" - Bluetooth: 0xE1, WiFi: "%%E1"
Check: "F5" - Bluetooth: 0xF5, WiFi: "%%F5"
Connect: "F8" - Bluetooth: 0xF8, WiFi: "%%F8"
Option: "F9" - Bluetooth: 0xF9, WiFi: "%%F9"
Wifi add: "%%" - WiFi: "%%" + "Header"
DB clear: Initialize all data of the app
Save & Back: Save and return to main screen.
Connect to Arduino
- Bluetooth Classic:
1. Bluetooth pairing
Select the module you want to connect on the Bluetooth setting screen of your mobile phone.
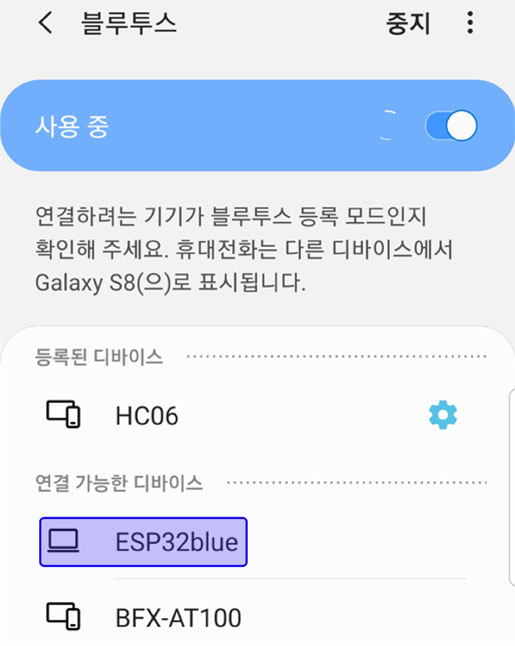
Depending on the module, input the password when requesting the pairing password and click the confirm when the connection message is output as shown below.

Bluetooth pairing complete

2. Bluetooth 2.0 Search and Connection in App
Click the Bluetooth icon in the app and select Bluetooth 2.0 in Select Ver.
Click the Bluetooth button and select the module name you want to connect.

- Bluetooth BLE:
For BLE, Bluetooth pairing is not required.
An error message is displayed when Bluetooth pairing is attempted with the BLE module.
In case of the ESP32 module, if the same mac address is registered as Bluetooth Classic, it is recommended first to unpair it and connect it to the ESP32 BLE.
Select Bluetooth 4.0 in Select Ver and then select the BLE module to connect.

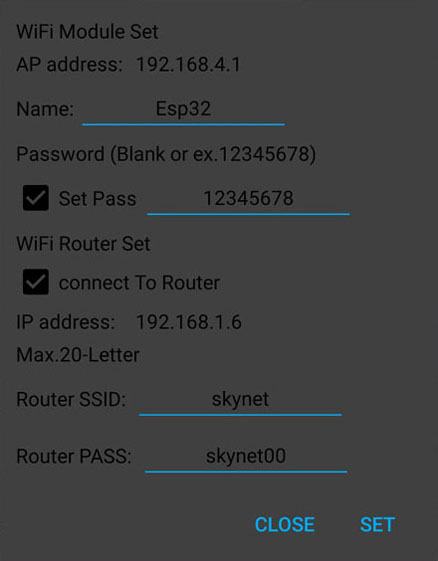
- Wifi:
A. Direct connection to Access Point of Arduino Wi-Fi module
Select the name of Wi-Fi module on your phone's Wi-Fi connection screen.

Check that the app's wifi connection name is the name of Wi-Fi module (e.g. Esp32).
Connect to the specified Access Point IP: 192.168.4.1.

B. Connection through a router
If the Wi-Fi module of Arduino is connected to a router (eg skynet) and the IP assigned by the router (eg 192.168.1.6) is known, connect to the assigned IP.


If you click the icon displayed after connecting to the Wi-Fi or Bluetooth module, 0xF5 or "%%F5" is transmitted for checking whether there is a new value or not in Arduino.
Protocol for remote control
Send Data From App To Arduino
- Bluetooth Classic:
Button: 0xF0 + 1byte Num + 0xF1
Joystick: 0xF3 + 1byte Num(id) + 2byte Num(heading) + 1byte Num(strength) + 0xF1
Connection: 0xF8 + "connect" + \n
Disconnction: 0xF8 + "disconnect" + \n
Text: Text + Endline Option(None / '\n' / '\r' / "\r\n")
Check: 0xF5
- Bluetooth BLE:
Button: 0xF0 + 1byte Num + 0xF1
Joystick: 0xF3 + 1byte Num(id) + 2byte Num(heading) + 1byte Num(strength) + 0xF1
Connection: "%%F8" + "connect" + \n
Disconnction: "%%F8" + "disconnect" + \n
Text: Text + Endline Option(None / '\n' / '\r' / "\r\n")
Check: 0xF5
- Wifi (String)
Button: %%F0 + Value + %%F1
Joystick: %%F3 + Joystic ID + Count + %% + Heading + %% + Strength + %%F1
Connection: %%F8 + connect + \n
Disconnction: %%F8 + disconnect + \n
Text Send: String + Endline Option(None / '\n' / '\r' / "\r\n")
Check: %%F5
Recieve Data From Arduino To App
- Bluetooth Classic:
///////////////////////////////////////// ESSENTIAL (0xF0, 0xF3,0xF4)
Button State: 0xF0 + 1byte Num + 0xF1
Joystick State: 0xF3 + 1byte Num + 2byte Num + 1byte Num + 0xF1
Button Echo: 0xF0 + 1byte Num + 0xE1
Joystick Echo: 0xF3 + 1byte Num + 2byte Num + 1byte Num + 0xE1
Text: 0xF4 + Text + 0xF1
///////////////////////////////////////// CONNECTION (0xF8)
send Disconnect: 0xF8 + 0x01 + 0x00
request Pass: 0xF8 + 0x02 + 1byte Num(length) + "Pass Name"
response Pass: 0xF8 + 0x03 + 1byte Num
send Message: 0xF8 + 0x04 + String + 0xF1
///////////////////////////////////////// OPTION (0xF9)
set Active Joystic: 0xF9 + 0x01 + 1byte Num + 0x00
set Joystick Interval: 0xF9 + 0x02 + 2byte Num
set Joy Zero Range: 0xF9 + 0x03 + 1byte Num + 0x00
set Joy Strength Adjust: 0xF9 + 0x04 + 1byte Num + 0x00
set Request: 0xF9 + 0x05 + 1byte Num + 0x00
set Request Interval: 0xF9 + 0x06 + 2byte Num
set Left Pad Mode: 0xF9 + 0x07 + 1byte Num + 0x00
set Joy Way4: 0xF9 + 0x08 + 1byte Num + 0x00
set Display Add Button: 0xF9 + 0x09 + 1byte Num + 0x00
set SSID Label Mode: 0xF9 + 0x0A + 1byte Num + 0x00
use Gravity And Interval: 0xF9 + 0x0B + 2byte Num
set Add Button Label: 0xF9 + 0x0C + String + 0xF1
set Left Pad Or All Toggle: 0xF9 + 0x0D + String + 0xF1
set Right Pad Toggle: 0xF9 + 0x0E + String + 0xF1
set Button Toggle: 0xF9 + 0x0F + String + 0xF1
dialog Radio: 0xF9 + 0x10 + "RAD:" + String + 0xF1
dialog Checkbox: 0xF9 + 0x10 + "CKB:" + String + 0xF1
dialog Choose: 0xF9 + 0x10 + "CHD:" + String + 0xF1
dialog List: 0xF9 + 0x10 + "LSD:" + String + 0xF1
dialog Input: 0xF9 + 0x10 + "STR:" + String + 0xF1
- Bluetooth BLE:
///////////////////////////////////////// ESSENTIAL (0xF0, 0xF3,0xF4)
Button State: 0xF0 + 1byte Num + 0xF1
Joystick State: 0xF3 + 1byte Num + 2byte Num + 1byte Num + 0xF1
Button Echo: 0xF0 + 1byte Num + 0xE1
Joystick Echo: 0xF3 + 1byte Num + 2byte Num + 1byte Num + 0xE1
Text: 0xF4 + Text + 0xE1/F1
///////////////////////////////////////// CONNECTION (0xF8)
send Disconnect: 0xF8 + 0x01 + 0x00
request Pass: 0xF8 + 0x02 + 1byte Num(length) + "Pass Name"
response Pass: 0xF8 + 0x03 + 1byte Num
send Message: 0xF8 + 0x04 + String + 0xF1
///////////////////////////////////////// OPTION (0xF9)
set Active Joystic: 0xF9 + 0x01 + 1byte Num + 0x00
set Joystick Interval: 0xF9 + 0x02 + 2byte Num
set Joy Zero Range: 0xF9 + 0x03 + 1byte Num + 0x00
set Joy Strength Adjust: 0xF9 + 0x04 + 1byte Num + 0x00
set Left Pad Mode: 0xF9 + 0x05 + 1byte Num + 0x00
set Joy Way4: 0xF9 + 0x06 + 1byte Num + 0x00
set Display Add Button: 0xF9 + 0x07 + 1byte Num + 0x00
set SSID Label Mode: 0xF9 + 0x08 + 1byte Num + 0x00
use Gravity And Interval: 0xF9 + 0x09 + 2byte Num
set Add Button Label: 0xF9 + 0x0A + String + 0xF1
set Left Pad Or All Toggle: 0xF9 + 0x0B + String + 0xF1
set Right Pad Toggle: 0xF9 + 0x0C + String + 0xF1
set Button Toggle: 0xF9 + 0x0D + String + 0xF1
dialog Radio: 0xF9 + 0x0E + "RAD:" + String + 0xF1
dialog Checkbox: 0xF9 + 0x0E + "CKB:" + String + 0xF1
dialog Choose: 0xF9 + 0x0E + "CHD:" + String + 0xF1
dialog List: 0xF9 + 0x0E + "LSD:" + String + 0xF1
dialog Input: 0xF9 + 0x0E + "STR:" + String + 0xF1
- Wifi (String):
///////////////////////////////////////// ESSENTIAL (%%F0, %%F3, %%F4)
1. Button State: %%F0 + Value + %%F1 + '\n'
2. Joystick State: %%F3 + Joystic ID + %% + Heading + %% + Strength + %%F1 + '\n'
3. Button Echo: %%F0 + Value + %%E1 + '\n'
4. Joystick Echo: %%F3 + Joystic ID + %% + Heading + %% + Strength + %%E1 + '\n'
5. Text: %%F4 + Text + %%F1 + '\n'
///////////////////////////////////////// CONNECTION (%%F8)
6. send Disconnect: %%F8 + DIS + '\n'
7. request Pass: %%F8 + "bool" + "Pass Name" + '\n'
8. response Pass: %%F8 + RES: + "Cookie or bool" + '\n'
9. send Wifi Info: %%F8 + INF: + String + '\n'
10. send Message: %%F8 + MES: + String + '\n'
11. response Fail Resend: %%F8 + RFR: + "bool" + '\n'
///////////////////////////////////////// OPTION (%%F9)
12. set Active Joystick: %%F9 + ACT: + "bool" + '\n'
13. set Joystick Interval: %%F9 + JSI: + "value" + '\n'
14. set Joy Zero Range: %%F9 + JZR: + "value" + '\n'
15. set Joy Strength Adjust: %%F9 + ADJ: + "bool" + '\n'
16. set Request: %%F9 + REQ: + "bool" + '\n'
17. set Request Interval: %%F9 + INT: + "value" + '\n'
18. set Left Pad Mode: %%F9 + LPM: + "value" + '\n'
19. set Joy Way4: %%F9 + SJW: + "value" + '\n'
20. set Display Add Button: %%F9 + DAB: + "value" + '\n'
21. set SSID Label Mode: %%F9 + SLM: + "value" + '\n'
22. use Gravity And Interval: %%F9 + UGI: + "value" + '\n'
23. set Add Button Label: %%F9 + ABL: + "String" + '\n'
24. set Left Pad Or All Toggle: %%F9 + LTG: + "String" + '\n'
25. set Right Pad Toggle: %%F9 + RTG: + "String" + '\n'
26. set Button Toggle: %%F9 + BTG: + "String" + '\n'
27. dialog Radio: %%F9 + RAD: + "String" + '\n'
28. dialog Checkbox: %%F9 + CKB: + "String" + '\n'
29. dialog Choose: %%F9 + CHD: + "String" + '\n'
30. dialog List: %%F9 + LSD: + "String" + '\n'
31. dialog Input: %%F9 + STR: + "String" + '\n'
App items that can be controlled by Arduino according to the protocol
Other protocol control
6. send Disconnect

click "Disconnect" button of Wi-Fi and Bluetooth.
7. request Pass

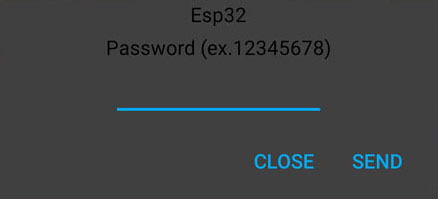
8. response Pass


9. send Wifi Info
This code applies only to Wi-Fi and transmits Wi-Fi connection information to use in 21. set SSID Label Mode.
10. send Message

11. response Fail Resend
This code only applies to Wi-Fi and set whether or not to use the function to retransmit if the response to the app's request fails.
false: Applies only when the Arduino intentionally does not respond to HTTP requests of the app. (e.g. ESP01)
13. set Joystick Interval
21. set SSID Label Mode

27. dialog Radio
28. dialog Checkbox

29. dialog Choose

30. dialog List

31. dialog Input

ARDUINO ESP01 JOYSTICK
[Arduino] - Setting up Wi-Fi module ESP01 and basic code for Arduino remote control
[Arduino/ADUPAD] - Arduino WiFi remote control with ADUPAD and ESP-01
[Arduino] - Arduino Basic code for bluetooth remote contol with HC-06
[Arduino/ADUPAD] - Arduino Bluetooth remote control with ADUPAD and HC-06
[Arduino] - Arduino Basic code for BLE remote contol with BT05
[Arduino/ADUPAD] - Arduino BLE remote control with ADUPAD and BT05
[Arduino] - ESP32/NodeMcu Basic code for WiFi remote contol
[Arduino/ADUPAD] - ESP32/NodeMcu WiFi remote control with ADUPAD
[Arduino/ADUPAD] - ESP32 Bluetooth remote control with ADUPAD
[Arduino/ADUPAD] - ESP32 BLE remote control with ADUPAD
'Arduino > ADUPAD' 카테고리의 다른 글
| ESP32 BLE remote control with ADUPAD (0) | 2022.12.04 |
|---|---|
| ESP32 Bluetooth remote control with ADUPAD (0) | 2022.12.04 |
| ESP32/NodeMcu WiFi remote control with ADUPAD (0) | 2022.12.03 |
| Arduino BLE remote control with ADUPAD and BT05 (0) | 2022.11.25 |
| Arduino Bluetooth remote control with ADUPAD and HC-06 (0) | 2022.11.24 |
| Arduino WiFi remote control with ADUPAD and ESP-01 (0) | 2022.11.21 |