Key code for remote control
- Set WiFi library for ESP32 or ESP8266 NodeMcu
ESP32
#include <WiFi.h>      // wifi library for esp32
#include <WiFiClient.h>// access point library for esp32
#include <WiFiAP.h>    // access point library for esp32

WiFiServer server(80); // set port number 80
WiFiClient client;     // set wifi object
ESP8266 NodeMcu
#include <ESP8266WiFi.h> // wifi library for esp8266 with access point & client functions

WiFiServer server(80);   // set port number 80
WiFiClient client;       // set wifi object
- ACCESS POINT name and password setting for ESP-01
const char ssidAP[] = "Esp32";   // your network SSID (name)
const char passAP[] = "12345678"; //"1234test";         // your network password
- If you want to use the internal network through a router connection, set the name and password of the router that ESP32 or ESP8266 NodeMcu needs to connect to.
const char ssid[] = "skynet";    // "SK_WiFiGIGA40F7" your network SSID (name)
const char pass[] = "skynet00";  // "1712037218" your network password
- Function for data transmission via WiFi
void http_response() {
  Serial.println(Data);  // output sending data to serial monitor
  client.print(F("HTTP/1.1 200 OK\r\n\r\n")); // HTTP response Header
  client.println(Data);                // send data
  Data = "";
}
- Function to convert ip address to string
String toStringIp(IPAddress ip) {
  String res = "";
  for (int i = 0; i < 3; i++) res += String((ip >> (8 * i)) & 0xFF) + ".";
  res += String(((ip >> 8 * 3)) & 0xFF);
  return res;
}
- setup() function
void setup() {
  Serial.begin(115200); // Set the baud rate for communication with the serial monitor of the Arduino IED to 115200
  if (wifiRouter) WiFi.mode(WIFI_AP_STA); // Access point and router connection mode setup (AP+STA)
  else WiFi.mode(WIFI_AP);                // only Access point mode
  WiFi.softAP(ssidAP, passAP);            // active Access point
  ap = toStringIp(WiFi.softAPIP());       // get ip of the Access point
  Serial.print(F("AP address: "));        // output ip of the Access point to serial monitor
  Serial.println(ap);
  if (wifiRouter) {                       // if use a router connection
    if (pass == "") WiFi.begin(ssid);     // if not set password of the router
    else WiFi.begin(ssid, pass);          // Connect to WPA/WPA2 network of the router
    uint8_t wifi_count = 0;
    while (WiFi.status() != WL_CONNECTED) { // need some time to connect to the router
          delay(200); Serial.print(F("."));
          wifi_count++;
          if (wifi_count == 50) break;
    }
    delay(10);
    ip = toStringIp(WiFi.localIP());      // get assigned IP
    Serial.print(F("IP address: "));      // output assigned IP to serial monitor
    Serial.println(ip);
  }
  server.begin();                         // start HTTP server
}
- loop() function to output all data received via WiFi
void loop() {
  client = server.available(); // Whether the server has data to receive and set now client
  String temp = "";
  while (client.connected()) { // Enter an infinite loop first to prevent re-execution of "client = server.available();"
    if(client.available()) {   // If the client has data
      if (client.peek() == '\n') char dump = client.read(); // dump '\n'
      else {
        temp = client.readStringUntil('\r');
        Serial.println(temp);
        if (temp.startsWith(F("GET"))) { // message for response
          Data = "Hello World ";
          Data += random(100,200);
        }
      }
      if (temp.length() == 0) { http_response(); break; } // end of received data
    } else break;
  }
  delay(10); // time for sending data at wifi component of ESP32
}
ESP32_WIFI_BASIC.zip
ESP8266_WIFI_BASIC.zip
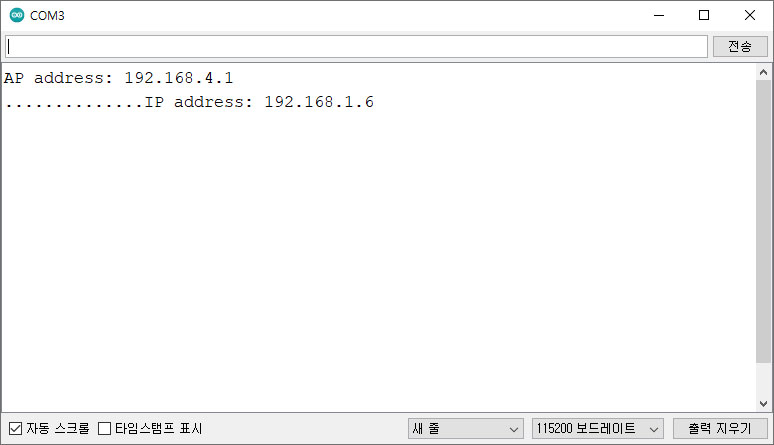
- Output of Serial Monitor after upload scketch "ESP32_WIFI_BASIC.ino"

Connecting directly to the ESP32 or NodeMcu and then connecting the access point
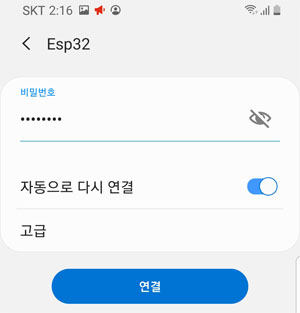
- Connect to ESP32 or NodeMcu on the WiFi Setting of a mobile phone.

- Input the Password for the ACCESS POINT of ESP01.

- Select "Keep WiFi on" if the message output below.

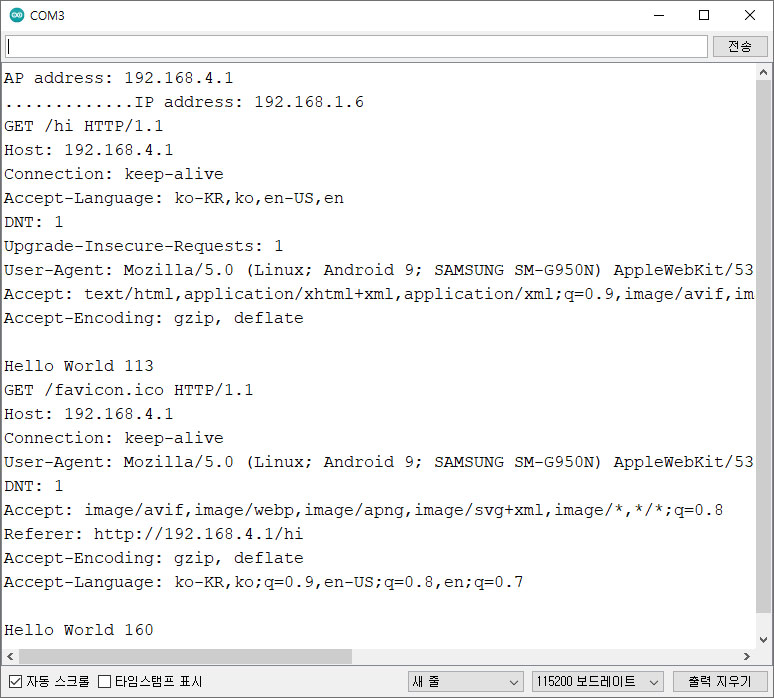
- Input the address "192.168.4.1/hi" on web browser.


Connecting to the assigned IP while ESP01 is connected to the router
- Input the assigned IP address "192.168.1.6" on web browser of PC connected to network of "skynet".


[Arduino/ADUCON] - ESP32/NodeMcu WiFi remote control with ADUCON
[Arduino/ADUPAD] - ESP32/NodeMcu WiFi remote control with ADUPAD
[Arduino/ADUCON] - ADUCON - Arduino wireless remote control application
[Arduino/ADUPAD] - ADUPAD - Arduino wireless remote control PAD application
https://play.google.com/store/apps/details?id=com.tistory.postpop.hmi
ADUCON - Google Play 앱
무선(WiFi/Bluetooth/BLE)을 통한 Arduino 원격 제어 앱
play.google.com
https://play.google.com/store/apps/details?id=io.kodular.skyship72.pad01
ADUPAD - Google Play 앱
무선(WiFi/Bluetooth/BLE)을 통한 Arduino 원격 제어 PAD
play.google.com
'Arduino' 카테고리의 다른 글
| ESP32 - 온도 습도 센서 AHT20 예제, I2C 통신 (0) | 2024.08.10 |
|---|---|
| 아두이노 와이파이 연결 도우미 앱 (0) | 2024.01.15 |
| ESP32 CAM 화질 테스트 및 온보드 LED 플래시 라이트 제어하기 (0) | 2023.01.24 |
| Arduino Basic code for BLE remote contol with BT05 (0) | 2022.11.25 |
| Arduino Basic code for bluetooth remote contol with HC-06 (0) | 2022.11.23 |
| Setting up Wi-Fi module ESP01 and basic code for Arduino remote control (0) | 2022.11.16 |
| 아두이노 - 와이파이, ESP01 wifi 모듈 무선 원격제어 그리고 시리얼 통신 - 6편 (10) | 2022.06.08 |
| arduino - Simple Melody 이용 피에조 부저 멜로디 코딩하기, Esp01, EEPROM (0) | 2020.09.19 |

