


The default baud rate of BT05 is 9600. Therefore, software serial can be used in Arduino without a baud rate change.

- Wire connection for Arduino and BT05
BT05 Arduino
VCC -> 3.3V/5V
GND -> GND
TXD -> Pin 2 (Set as RX pin in Arduino code)
RXD -> Pin 3 (set as TX pin in Arduino code)
- How to check baud rate of the module
1. Module and Arduino must be well wired in hardware.
2. Upload the basic Sketch which is coded baud rate "9600" of Serial.
3. set option to "Both NL & CR" for Serial Monitor of Arduino IDE.
4. Set baud rate to "9600" at Serial Monitor of Arduino IDE.
6. Input "AT" at text window and if get "OK" as a response, the baud rate of the module is 9600.
7. If not, try to change baud rate to 115200 or another value in the sketch and upload.
8. Set baud rate to "115200" or another value at Serial Monitor of Arduino IDE.
9. Input "AT" at text window and if get "OK" as a response, the baud rate of the module is 115200. if not repeat no.7 ~ 9.
#include <SoftwareSerial.h>
#define BT_rxPin 3 // Bluetooth RX -> 3(arduino TX)
#define BT_txPin 2 // Bluetooth TX -> 2(arduino RX)
SoftwareSerial SerialBT(BT_txPin, BT_rxPin); // (arduino RX, arduino TX)

void setup() {
  Serial.begin(9600);  // Serial Monitor and baud rate
  SerialBT.begin(9600);   // ESP01 serial and baud rate
}

void loop() {
  if (SerialBT.available()) {
    Serial.write(SerialBT.read()); //Output the contents of the ESP01 to the serial monitor
  }
  if (Serial. available()) {
    SerialBT.write(Serial.read()); //Write the contents of the serial monitor to the ESP01
  }
}
- How to change baud rate of BT05
| the Bluetooth serial baud rate list of BT05 4---------9600 (Default) 5---------19200 6---------38400 7---------57600 8---------115200 |
If current baud rate is 9600 and want to change the baud rate to 115200, input "AT+BAUD8" at text window and get OK115200 as a response, then the change has been made.
Precautions when using the BT05 with Serial communication
While receiving data from HC-06 through software serial communication in Arduino, If Arduino transmits data to HC-06 some of the data received through Bluetooth from the app may be missing. (Probably the first byte) This could be an error in the software serial library. Therefore, It must be coded to transmit data to HC-06 after receiving data from HC-06.
When sending data sequentially using multiple functions such as "SerialBT.write(setVal, 4); SerialBT.write(setVal, 4); SerialBT.write(setVal, 4);", the dealay must be given between each function about 10 Milliseconds. Sending the function's data consecutively without delay can cause certain bytes in the function to be missed. This is probably because BT05 needs time to complete data transmission.
Key code for remote control
- Set Software serial to communicate with BT05.
#include <SoftwareSerial.h>
#define BT_rxPin 3 // Bluetooth RX -> 3(arduino TX)
#define BT_txPin 2 // Bluetooth TX -> 2(arduino RX)
SoftwareSerial SerialBT(BT_txPin, BT_rxPin); // (arduino RX, arduino TX)
- Function that executes AT command for BT05 setup
String sendData(String order) {
  String command = F("AT+");
  command += order;
  command += F("\r\n");
  SerialBT.print(command); // send the read character to the SerialBT
  long int time = millis();
  String response = "";
  while( (time+500) > millis()) {
    while(SerialBT.available()) {
      char c = SerialBT.read(); //
      response+=c;
    }
    if (response.indexOf(F("OK")) != -1) break;
  }
  return response;
}
- setup() function
void setup() {
pinMode(ledPin, OUTPUT);
digitalWrite(ledPin, LOW);
Serial.begin(9600); // Software Serial for Serial monitor of Arduino IDE
SerialBT.begin(9600); // Software Serial for BT05
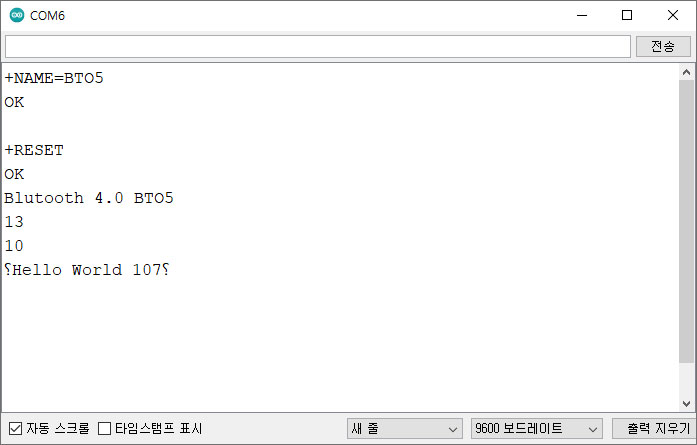
Serial.println(sendData(F("NAMEBTO5"))); // SET NAME "BTO5"
Serial.println(sendData(F("RESET"))); // SOFTWARE REBOOT
Serial.println(F("Blutooth 4.0 BTO5"));
}
- loop() function
bool gotData = false;

void loop() {
  if (SerialBT.available()) { // when incomming data from HC06
    uint8_t temp = SerialBT.read();
    Serial.println(temp); // Output data of the HC06 to the serial monitor.
    if (temp == 10) gotData = true; // if got '\n', the flag for response
  } else {
    if (gotData) {   // if response
      String setVal = "";
      setVal += char(0xF4);      // protocol header of text for ADUCON with bluetooth
      setVal += "Hello World ";
      setVal += random(100,200); // the message for sending
      setVal += char(0xF1);      // protocol footer of text for ADUCON with bluetooth
      Serial.println(setVal);    // Output the message to the serial monitor.
      SerialBT.print(setVal);    // send data to HC06 as response
      gotData = false;           // initialize the flag
      delay(10);                 // delay for sending data at BT05
    }
  }
}
SERIAL_BASIC_BT05.zip
- Output of Serial Monitor after upload scketch "ARDUINO_BT05_BASIC.ino"
*** To test the code above, you need an app that transmits data via Bluetooth.
[Arduino/ADUCON] - Arduino BLE remote control with ADUCON and BT05
[Arduino/ADUPAD] - Arduino BLE remote control with ADUPAD and BT05
[Arduino/ADUCON] - ADUCON - Arduino wireless remote control application
[Arduino/ADUPAD] - ADUPAD - Arduino wireless remote control PAD application
https://play.google.com/store/apps/details?id=com.tistory.postpop.hmi
ADUCON - Google Play 앱
무선(WiFi/Bluetooth/BLE)을 통한 Arduino 원격 제어 앱
play.google.com
https://play.google.com/store/apps/details?id=io.kodular.skyship72.pad01
ADUPAD - Google Play 앱
무선(WiFi/Bluetooth/BLE)을 통한 Arduino 원격 제어 PAD
play.google.com
'Arduino' 카테고리의 다른 글
| ESP32 - 온도 습도 센서 AHT20 예제, I2C 통신 (0) | 2024.08.10 |
|---|---|
| 아두이노 와이파이 연결 도우미 앱 (0) | 2024.01.15 |
| ESP32 CAM 화질 테스트 및 온보드 LED 플래시 라이트 제어하기 (0) | 2023.01.24 |
| ESP32/NodeMcu Basic code for WiFi remote contol (0) | 2022.11.29 |
| Arduino Basic code for bluetooth remote contol with HC-06 (0) | 2022.11.23 |
| Setting up Wi-Fi module ESP01 and basic code for Arduino remote control (0) | 2022.11.16 |
| 아두이노 - 와이파이, ESP01 wifi 모듈 무선 원격제어 그리고 시리얼 통신 - 6편 (10) | 2022.06.08 |
| arduino - Simple Melody 이용 피에조 부저 멜로디 코딩하기, Esp01, EEPROM (0) | 2020.09.19 |